High Level Educator/Business Owner Application Walk Through
Signing Up
- Choosing Your Role: To get started, you’ll first need to sign up. Upon visiting the sign-up section, select “School/Business Sign-Up.” Here, you’ll provide essential details about your institution, including its name, the approximate number of employees, and the number of students.
- Account Information: After the initial sign-up, you’ll proceed to enter your account information. If you’ve already created an account, you can simply log in to access your dashboard.
Dashboard Overview
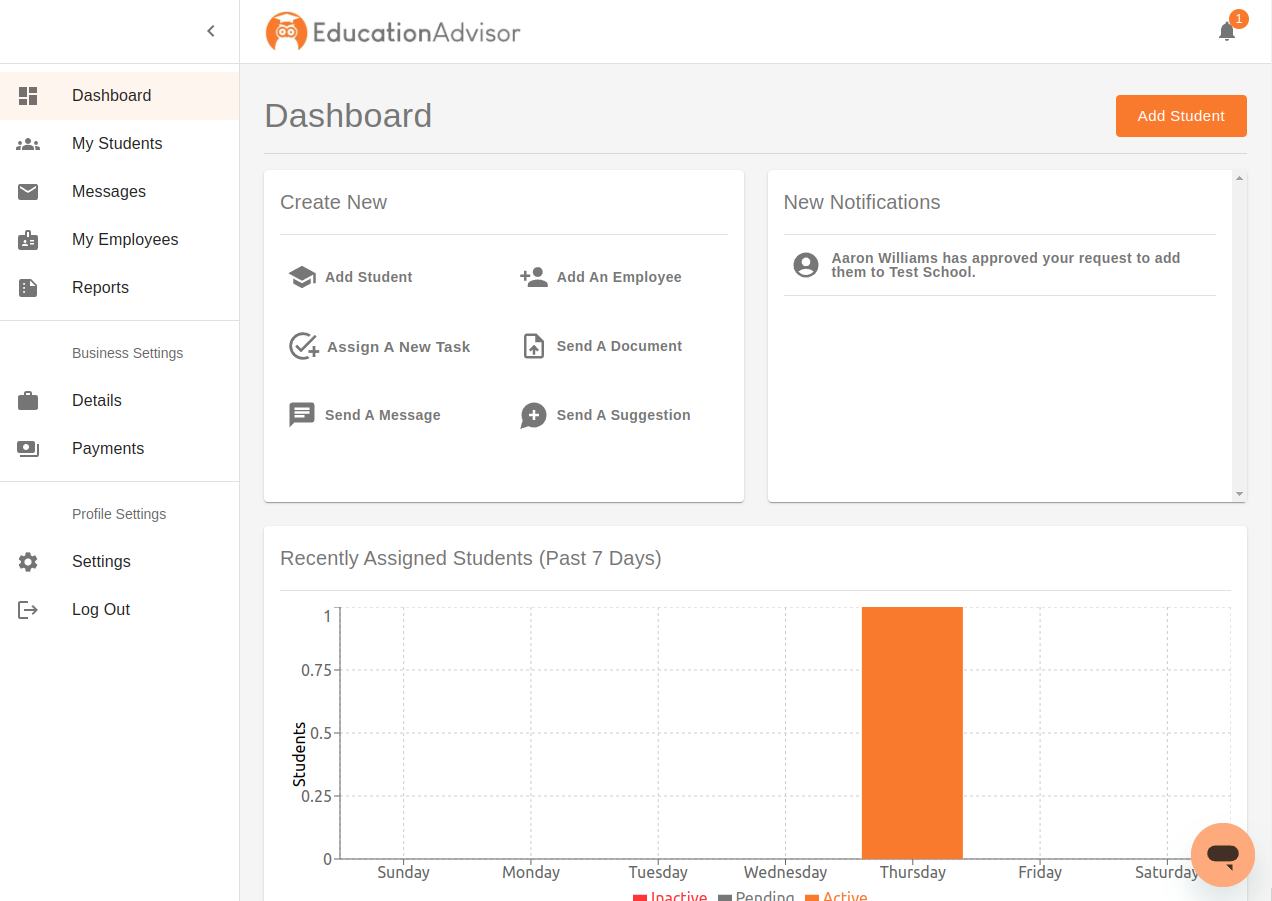
- Dashboard Highlights: Once logged in, you’ll find yourself on the dashboard. This central hub provides a snapshot of your institution’s recent activities, including recently assigned students, help resources, and recent invoices.
- Adding New Students: One of the key actions you can take from the dashboard is adding new students to your institution. You can also interact with these students directly from this section.
Understanding User Roles
- Owner, Manager, and Employee Access: As the owner of the institution, you have access to all sections and functionalities within the application. However, it’s important to note that managers and employees have more limited access.
- Employee Management: In the employee section, you can add new employees and designate their roles as employee, manager, or owner. Owners have full access, managers have limited access, and employees have access to messaging, student dashboards, and settings.
Student Management
- Viewing Assigned Students: In the student section, you can access information about all students in your institution. Employees will only see students assigned to them.
- Interacting with Students: Within the student profiles, you can review student details, their loan applications, scholarships, and engage in messaging. You can also assign tasks and share documents with your students to facilitate their educational journey.
- Suggesting Educational Paths: The application allows you to suggest different schools, institutions, industries, or occupations to your students. Additionally, an AI feature offers suggestions tailored to their interests and goals.
Reporting and Settings
- Reporting: The reporting section provides institution-wide reports, allowing you to monitor various aspects of your institution’s performance over different timeframes.
- Institution Details: You can update your institution’s details, including its address and website. Enabling the “Make Your Institution Public” option allows others to view and sign up through your portal.
- Payment and Invoices: The payment section allows you to manage your subscription and view/download invoices. You can also access your profit and loss information here.
- Personal Settings: Lastly, the settings section covers your personal account settings. Enabling the “Make Your Account Public” option allows students in your area to find and connect with you.
Our application provides a robust set of tools to efficiently manage your educational institution. Whether you’re an owner, manager, or employee, you can tailor your interactions with students and monitor your institution’s performance.
If you have any questions or need further assistance, please don’t hesitate to reach out to us. Thank you for choosing Education Advisor, and we hope this guide has helped you navigate the application’s features effectively.

